Lab 2. Phishing-resistant authentication
Scenario
Contoso's security team discovered that an employee typed their password, and then their Authenticator approval, into a convincing phishing page. Attacker-in-the-middle kits relay both in real time, so "password plus push notification" is no longer enough for sensitive access. Your job: make sure a stolen password, even with a relayed approval, cannot open the user's mailbox. You will enforce phishing-resistant MFA with a Conditional Access authentication strength and prove it with a passkey.
Objectives
- Read the tenant's authentication method policy for passkeys
- Build a Conditional Access policy that requires the built-in Phishing-resistant MFA strength for Exchange Online
- Watch a user who only has Authenticator push get stopped
- Register a passkey in Microsoft Authenticator and sign in with it
- Explain the difference between MFA, passwordless MFA and phishing-resistant MFA
Task 1. Inspect the passkey authentication method
Admin window
Passkeys must be enabled in the tenant before anyone can register one. The instructor has already done this. You read the setting so you know where it lives.
- In the Entra admin center left menu select Protection.
- Select Authentication methods.
- Select Policies. A table of methods appears.

- Select the row Passkey (FIDO2).
- On the Enable and Target tab confirm Enable is On and the target is All users.
- Select the Configure tab and confirm Allow self-service set up is Yes.
- Select Cancel (bottom of the panel). Do not change anything.
Expected result
Passkey (FIDO2) is Enabled for All users and self-service set-up is allowed. Microsoft Authenticator is also Enabled: that is the push method the driver registered in Lab 0.
Task 2. Create the Conditional Access policy
Admin window
- In the left menu select Protection Conditional Access.
- Select Policies.
- Select + New policy at the top of the page.

- In Name type CA-NN-Phishing-Resistant.
- Under Assignments select Users (it reads 0 users and groups selected).
- On the Include tab choose Select users and groups, then tick Users and groups.
- In the panel that opens, type Lab-Users-NN in the search box, tick the group, and select Select.

- Select Target resources (it reads No target resources selected).
- Leave Resources (formerly cloud apps) selected. On the Include tab choose Select resources.
- Select None under Select, type Exchange in the search box, tick Office 365 Exchange Online, and select Select.

- Under Access controls select Grant (it reads 0 controls selected).
- Keep Grant access selected. Tick Require authentication strength.
- In the drop-down that appears choose Phishing-resistant MFA.
- Select Select at the bottom of the panel.

- At the bottom, under Enable policy, select On.
-
Check the summary against the table, then select Create.
Section Must show Name CA-NN-Phishing-ResistantUsers 1 group: Lab-Users-NNTarget resources 1 resource: Office 365 Exchange Online Grant Require authentication strength: Phishing-resistant MFA Enable policy On
Check before you select Create
Users must show your group only, never All users. Selecting All users would lock the instructor and every other pod out of their mailboxes. Target resources must be Exchange Online only: a passkey on the driver's phone cannot be presented inside the remote desktop session you use in Labs 4 and 5, so a policy on All resources would block your own lab desktop later.
Expected result
The policy list shows CA-NN-Phishing-Resistant
with State: On.
Wait for propagation
A new Conditional Access policy can take 1 to 2 minutes to apply. Always test in a fresh browser session so no token issued before the policy is reused.
Task 3. Try to sign in with password and push only
User window
- In the User window select your account picture at the top right and choose Sign out. Close the window and open a new one of the same kind.
- Go to
https://outlook.office.com. - Type lab-userNN@aurnis.dev, select Next, type the user password you set in Lab 0, and select Sign in.
- Driver's phone If an Authenticator prompt appears, type the number shown on the laptop and tap Yes.
Expected result
You do not reach the mailbox. One of two screens appears, and both prove the point:
- A registration interrupt: a page such as Set up a passkey or More information required asks you to register a stronger method before continuing. Password plus push was not enough. Leave this page open; Task 4 starts from here.
- A block: a page saying You cannot access this right now, with a message that your organisation requires a stronger authentication method.
Either way, the password was correct and the push was approved, yet access is denied. That is exactly what an attacker relaying your credentials would see.

- Admin window In the left menu select Identity Monitoring & health Sign-in logs.
- Find the newest row for lab-userNN (use Add filters, User, if the list is long) and select it.
- Select the Conditional Access tab in the details panel.
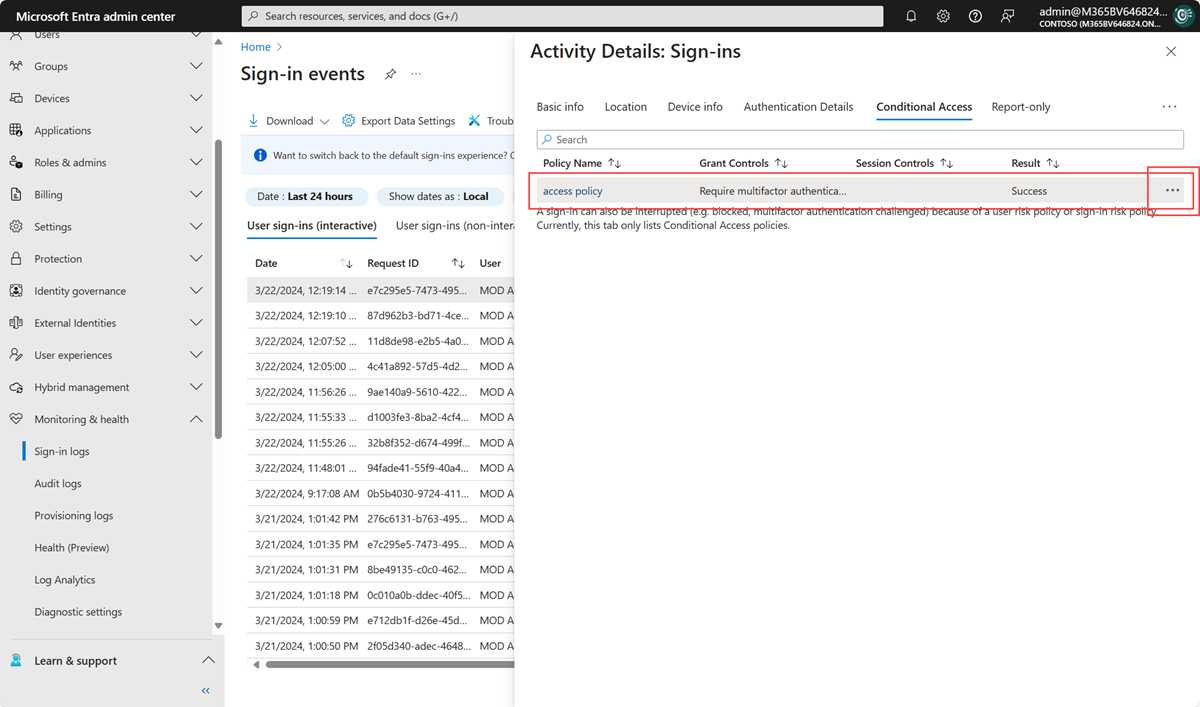
Expected result
CA-NN-Phishing-Resistant shows Failure. The
Authentication details tab shows the method used was Microsoft Authenticator push,
which does not satisfy the required strength.
Task 4. Register a passkey and sign in
User window Driver's phone
- If Task 3 ended on a registration interrupt, stay on that page and select Next;
the prompts match steps 3 to 6 below. Otherwise go to
https://mysignins.microsoft.com/security-infoin the User window (this page is not covered by your policy, so password plus push gets you in). - Select + Add sign-in method.
- In the list choose Passkey in Microsoft Authenticator and select Add. If asked, confirm the account with a push approval.

- On the phone, open Authenticator, tap the lab-userNN account, then Create a passkey, and complete the device unlock (Face ID, fingerprint or PIN). If the phone asks to enable Authenticator as a passkey provider in system settings, do so and return to the app.
- On the laptop follow the remaining prompts until the method is listed. Give the passkey the name Pod phone if asked, and select Done.
- Sign out of the User window, close it, open a fresh one, and go to
https://outlook.office.com. - Type the user name and select Next.
- Instead of typing the password, select Sign-in options (or Other ways to sign in), then Face, fingerprint, PIN or security key.
- The laptop shows a QR code. On the phone, scan it with the camera or with Authenticator, confirm with the device unlock, and wait.

Expected result
The mailbox opens. No password was typed. In the Admin window the newest sign-in log entry shows Authentication requirement: Multifactor authentication, the Conditional Access tab shows your policy as Success, and the method is Passkey (device-bound).
Bluetooth blocked on the laptop?
Cross-device passkey sign-in needs Bluetooth on both devices. If the laptop's Bluetooth
is disabled by policy, sign in from the phone's own browser instead: open
https://outlook.office.com on the phone and choose the passkey there.
Instructor note
The pod card carries a one-time Temporary Access Pass for the lab user. If the phone
cannot register a passkey, the pod signs in with the pass at the interrupt and
continues; at the end of this lab they set
CA-NN-Phishing-Resistant to Report-only so Lab 3
is unaffected. The passkey flow is demonstrated on the main screen regardless.
Task 5. Understand authentication strengths
Conditional Access can require not just "MFA" but a specific strength. The built-in strengths are:
| Strength | Example methods | Survives a real-time phishing relay? |
|---|---|---|
| Multifactor authentication | Password + SMS, password + Authenticator push, password + TOTP | No |
| Passwordless MFA | Authenticator phone sign-in, Windows Hello for Business, passkey | Mostly |
| Phishing-resistant MFA | Passkey (FIDO2), Windows Hello for Business, certificate-based authentication | Yes |
Tick the methods that are phishing-resistant:
- SMS code
- Email one-time code
- Microsoft Authenticator number matching
- FIDO2 security key
- Windows Hello for Business
- Passkey in Microsoft Authenticator
Answer: the last three. A passkey is bound to the site's origin, so a look-alike domain cannot ask the phone to sign a challenge for the real one.
Reflection
- Password alone, password plus push, passkey. Which of these would have protected the employee in the scenario, and why?
- Microsoft 365 Copilot can read everything the signed-in user can read. What does that change about the value of a single compromised account?
- Where would you start rolling out phishing-resistant MFA in your own organisation: administrators first, or the whole company?
Checklist
- Passkey (FIDO2) method confirmed enabled
-
CA-NN-Phishing-Resistantcreated and On, Exchange Online only - User stopped with password + push, failure visible in the sign-in log
- Passkey registered and successful sign-in recorded in the sign-in log
- Can explain the three authentication strengths